Manage host pool profiles
Host pool profiles simplify the creation of new host pools by letting you define reusable profiles for auto-scale settings, FSlogix settings, RDP settings, and directory settings. When configuring any of these for a host pool, you can select a predefined profile. This eliminates the need for manual configuration for each pool or schedule.
Auto-scale profiles are available only in the Nerdio Manager Premium edition.
Create a host pool profile
Complete the following steps to create a new host pool profile.
To create a profile:
-
Navigate to Settings > Profiles Management.
-
On the Profiles tab, select New profile.
-
Select the profile you wish to create:
-
Auto-scale: Enter the following information:
-
Auto-scale mode: From the drop-down list, select the auto-scale mode.
The following modes are available:
-
Shared: For all pooled dynamic hosts pools.
-
Schedule-based (Personal): For single user desktop personal host pools with auto-scaling that is performed as per the specified schedule.
-
User-driven (Personal): For single user desktop personal host pools with auto-scaling that is performed when there are no active or disconnected sessions.
-
-
Name: Enter the profile name.
-
Description: Enter the profile description.
-
For all the other parameters, see the relevant article:
-
For pooled dynamic host pools: Enable dynamic host pool Auto-scaling.
-
For single user desktop personal host pools: Enable personal host pool Auto-scaling.
-
-
-
Directory: Complete the steps as described in Configure the Host Pool's Active Directory Settings.
-
RDP: Complete the steps as described in Configure RDP Settings Profiles.
-
FSLogix: Complete the steps as described in FSLogix settings and configuration.
-
-
Once you have entered all the desired information, select Save.
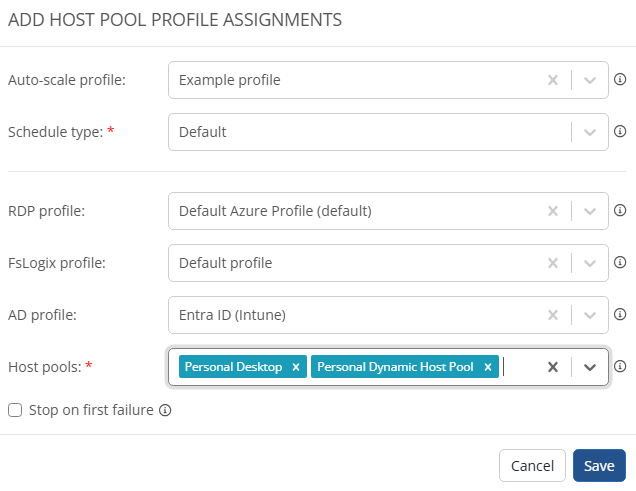
Assign a host pool profile
Once you created a host pool profile, you can assign it to relevant host pools.
To assign a profile to a host pool:
-
Navigate to Settings > Profiles Management.
-
From the action menu, select Assignments, then New assignments.
-
Enter the following information:
-
Auto-scale profile: From the drop-down list, select the auto-scale profile.
-
Schedule type: From the drop-down list, select the schedule type.
-
RDP profile: From the drop-down list, select the RDP profile type.
-
FSLogix profile: From the drop-down list, select the FSLogix profile type.
-
AD profile: From the drop-down list, select the AD profile.
-
Host pools: From the drop-down list, select the host pool(s).
-
Stop on first failure: Each host pool is processed one at a time. Select this option to cancel the remaining operations on the first failure.
-
-
Once you have entered all the desired information, select Save.
Note: You can perform the following on auto-scale profile assignments:
-
Edit selected Alternative: Select this to edit an alternative schedule.
-
Remove selected: Select this option to remove selected assignments.
-
Manage host pool profiles
You can manage existing host pool profiles.
To manage profiles:
-
Navigate to Settings > Profiles Management.
-
Locate the host pool profile you wish to work with.
-
Select the from the following:
-
Select the pencil
 icon to edit the profile.
 -
Select the more actions
 menu, for the following options:
-
Assignments: Edit the assignments.
-
Set default: Sets the profile as default.
-
Clone: Create a clone of the profile.
-
Delete: Delete the profile.
-
-
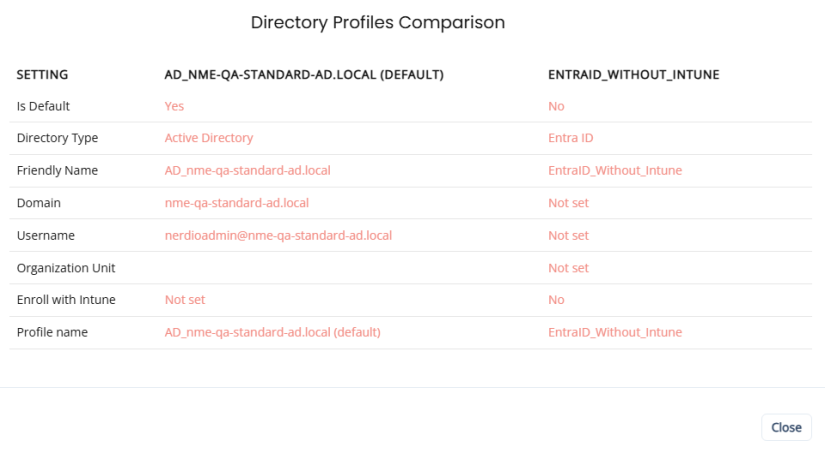
Compare host pool profiles
You can compare two existing host pool profiles.
To compare profiles:
-
Select the profiles you want to compare.
-
Select Compare.
-
Optionally, select Show only different to display only the properties that differ between the two profiles. Select Show all to return to showing all properties, including those that are identical between the two profiles.