Create and manage MSIX App attach images and host pool assignments
This topic discusses how to do the following:
-
Upload an MSIX app attach image.
-
Upload an MSIX package file.
-
Assign an app to a host pool.
-
Create a new version of an app.
-
Change an app to a new version.
Sample VHD(X) packages and certificate
To help you get you started, we created a few VHD(X) packages for some popular applications that you can download and start using in your AVD environment for testing purposes.
Note: These packages are not intended for production purposes. They should be used for proof of concept testing.
Google Chrome
Mozilla Firefox
Notepad++
PuTTY
VLC
Certificate
-
The certificate can be downloaded here.
-
The certificate is the same for all the packages.
Upload an MSIX App attach image file
Nerdio Manager allows you to upload new versions of packages and automatically apply them to existing host pools. In addition, Nerdio Manager can create an image from an existing MSIX package, or you can upload an image file.
To upload an image:
-
Navigate to Applications > App Attach.
-
Select Upload image.
-
Enter the following information:
-
Friendly Name: Type the name that you want to appear on the images list.
-
Description: Type a description.
-
Storage Location: From the drop-down list, select the linked app storage location in the AD-integrated Azure Files share.
Note: MSIX App Attach does not support Entra Domain Services or Entra ID. This needs to be Active Directory Domain Services (ADDS).
-
Version: Type the version number of the image that you are uploading. This must be unique.
-
Image File(s): Select the VHD(X)/CIM file(s) that contains the App Attach application expanded from the MSIX installer.
-
Certificate (.cer) File: Select the certificate file.
Note: A certificate that was used to create the MSIX package must be installed on all session hosts VMs. If you used a self-signed certificate to create the MSIX package, upload it here and it is automatically installed for you. Alternatively, you can install the certificate on the desktop image and re-image the session host VMs
-
-
Once you have entered all the desired information, select Upload.
The image is uploaded to Nerdio Manager.
Upload an MSIX package file
This feature is only available in the Nerdio Manager Premium edition.
If you do not already have a VHD/VHDX./CIM that contains the image, Nerdio Manager allows you to upload the MSIX file and Nerdio Manager automatically creates a VHD file for you.
To upload an MSIX package file:
-
Navigate to Applications > App Attach.
-
Select Upload MSIX apps(s).
-
Enter the following information:
- Image Name: Type the image name.
-
Storage Location: From the drop-down list, select the linked app storage location in the AD-integrated Azure Files share.
-
MSIX File(s): Select the MSIX file(s).
-
Certificate (.cer) File(s): Optionally, select the certificate file(s).
Note: To expand the MSIX app into a VHDX container, a temporary VM is created to perform the operation and then deleted. It is recommended that you simply let Nerdio Manager handle the temporary VM's configuration. Otherwise, select Show advanced settings to specify the temporary VM's details.
-
Once you have entered all the desired information, select OK.
The MSIX file is uploaded, and Nerdio Manager begins the process of creating a VM to package the file into a VHDX image.
Assign an app to a host pool
Once you have uploaded an MSIX app attach image, you can assign the app to a host pool.
To assign an app to a host pool:
-
Locate the host pool you wish to assign the app to.
-
Select from the following:
-
Classic UI: From the action menu, select Applications> App Attach.
-
New UI: From the more actions menu
 icon, select Applications> App Attach.
-
-
When the Manage MSIX App Attach window is displayed, select Add App Attach v1 package.
-
Enter the following information:
-
Image Source: From the drop-down list, select the location of the image that contains MSIX packages. The image can be stored in Nerdio Manager's image library or on any SMB file share that session host VMs have access to. If you have uploaded or created MSIX images using Nerdio Manager, select Image Library.
-
App Attach V1 Image: From the drop-down list, select an MSIX App Attach image containing the MSIX packages.
-
Image Version: From the drop-down list, select the image's version to be added to the host pool.
-
Packages: From the drop-down list, select one or more MSIX packages/apps present in the image to make available to users on this host pool.
-
Assignments: From the drop-down list, select the groups to assign the app to.
Notes:
-
The package in the file share closest to the host pool’s region is prioritized to reduce latency.
-
Ensure that the host pool has at least one running session host VM.
-
Each VM in the host pool must have certificates that were used to sign MSIX installed. Select Install certificates to install them if they aren't already.
-
-
-
Once you have entered all the desired information, select OK.
The MSIX app is added to the host pool.
Assign an App attach v2 app to users and groups
Once you have uploaded an MSIX App attach v2, you can assign the app to users and groups.
To assign an App attach v2 app to users and groups:
-
Navigate to Applications > App Attach.
-
Select the App Attach v2 packages tab.
-
Locate the App Attach v2 app you want to work with.
-
From the action menu, select Assignments.
-
Enter the following information:
-
Users and Groups: From the drop-down list, select the users and groups to assign the app to.
-
Host Pools: From the drop-down list, select the host pools to assign the app to
-
-
Once you have entered all the desired information, select OK.
The MSIX app is assigned to the users and groups.
Use the App attach v2 package wizard
The App Attach wizard can be used to deploy App Attach packages to all required AVD host pools automatically, without the need to manually deploy packages.
Note: This feature is applicable to App Attach v2 packages only. Ensure that the required Nerdio App Attach image version is replicated to all required regions before proceeding.
To use the App attach v2 package wizard:
-
Navigate to Applications > App Attach.
-
Select the App Attach v2 packages tab.
-
Select Add App Attach v2 package.
-
Enter the information in the App attach wizard.
-
In the Image tab, enter the following information:
-
Image source: From the drop-down list, select the image source.
-
App Attach v2 Image: From the drop-down list, select the application image.
-
Image Version: From the drop-down list, select the version of the application image.
-
Temporary replica: From the drop-down list, select the version replica used to extract metadata from the selected App Attach image.
-
Temporary host pool: From the drop-down list, select the temporary host pool used to expand the image.
-
Use cached metadata: Toggle this option to On to use cached metadata for the application image. If this image has been staged previously, Nerdio Manager will cache the metadata for the application to avoid the need to re-stage the package to a running VM.
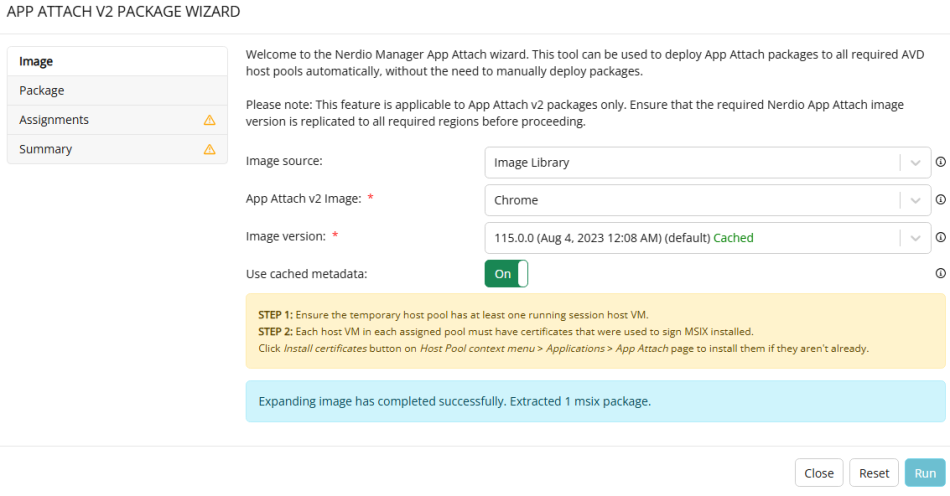
Note: A temporary host pool is required as a proxy to extract metadata from the selected App Attach image. No changes are made to the pool configuration and any host pool may be used. However, as best practice we recommend the creation of a dedicated App Attach pool. At least one desktop must be running in the pool to proceed.
-
-
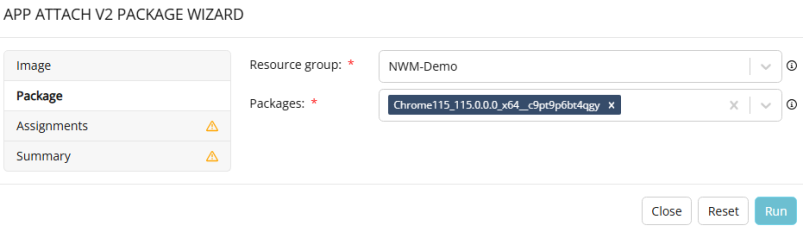
In the Package tab, enter the following information:
-
Resource group: From the drop-down list, select the resource group where the App Attach package is created.
Note: This resource group does not need to be in the same region as the pool assignments, but it is recommended as best practice.
-
Packages: From the drop-down list, select one or more MSIX packages to make available to users on the selected host pools.
-
-
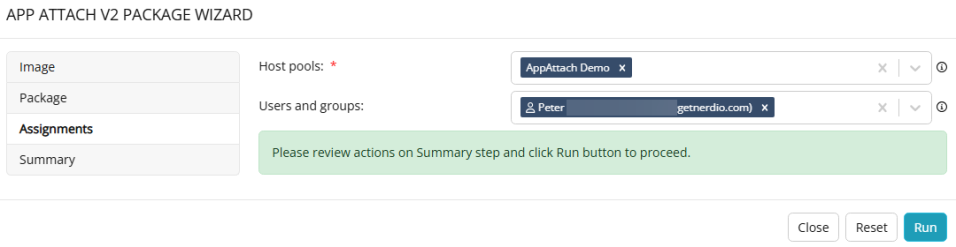
In the Assignments tab, enter the following information:
-
Host pools: From the drop-down list, select one or more host pools from the subscription of the selected resource group that are assigned to the package(s).
-
Users and groups: From the drop-down list, select the authorized users and groups to run the applications included in the selected package(s).
-
-
In the Summary tab, review the selections.
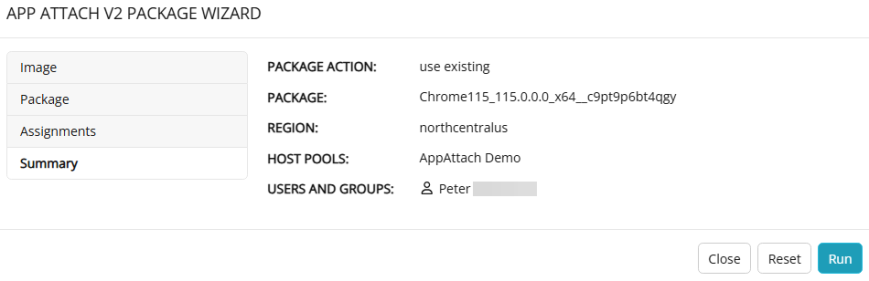
-
Once you have reviewed all the desired selections, select Run.
The App Attach wizard task starts. You can see the task's progress in the App Attach Tasks window.
Create a new version of an app
Nerdio Manager allows you to manage multiple versions of an app.
To add a new version of an app:
-
Navigate to Applications > App Attach.
-
Select either the Nerdio images or App Attach v2 packages tab.
-
Locate the image you want to add an app to.
-
From the action menu, select Upload version.
-
Enter the following information:
- Version: Type the version number of the image that you are uploading. This must be unique.
-
Image File(s): Select the VHD(X)/CIM file(s) that contains the App Attach application expanded from the MSIX installer.
-
Certificate (.cer) File(s): Optionally, select the certificate file(s).
Note: A certificate that was used to create the MSIX package must be installed on all session hosts VMs. If you used a self-signed certificate to create the MSIX package, upload it here and it is automatically installed for you. Alternatively, you can install the certificate on the desktop image and re-image the session host VMs.
-
Once you have entered all the desired information, select Upload.
The image is uploaded to Nerdio Manager
Change to a new version of an app
Nerdio Manager allows you to change to a new version an app.
To change to a new version of an app:
-
Navigate Applications > App Attach.
-
Select either the Nerdio images or App Attach v2 packages tab.
-
Locate the image you want to work with.
-
Select Image versions. The list of image versions displays.
-
Locate the image version you wish to set as the default.
-
Select Set as default. The confirmation window displays.
-
Select Update host pools where this package is assigned to assign the new version of the image to the host pools listed above.
-
Select OK.
The new version is now the default.
Upload a new image version of an app
Nerdio Manager allows you to upload a new image version an app.
To upload a new image version of an app:
-
Navigate Applications > App Attach.
-
Select either the Nerdio images or App Attach v2 packages tab.
-
Locate the image you want to work with.
-
From the action menu, select Upload a new Image version.
-
Enter the following information:
-
Version: Type the version number of the image that you are uploading. This must be unique.
-
Storage Location: From the drop-down list, select the linked app storage location in the AD-integrated Azure Files share.
-
Image File(s): Select the VHD(X)/CIM file(s) that contains the App Attach application expanded from the MSIX installer.
-
Certificate (.cer) File(s): Optionally, select the certificate file(s).
-
-
Once you have entered all the desired information, select Upload.