Refresh desktop images from the Azure Marketplace
Nerdio Manager allows you to refresh desktop images from the Microsoft published and managed images in the Azure marketplace.
This automated image refresh operation ensures that you always have a pristine image from Microsoft with all the latest OS patches applied. The refreshed image is automatically deployed to all session hosts that use it.
To refresh a desktop image from the Azure Marketplace:
-
Navigate to Desktop Images.
-
Locate the image you want to refresh.
-
Select the Power off & Set as image.
-
In the Schedule section, enable the scheduling function.
-
Enable Refresh image from Azure Marketplace.
-
Enter the following information:
-
Marketplace Image: From the drop-down list, select an image.
-
Join to AD: Select this option and then from the drop-down list, select an Entra Domain Services or an AD profile to directly join the image.
For example, you can select a Windows 10 (2004) EVD _ Office ProPlus -Gen2 (multi-session) image and join it to the nerdio.int (default) AD. You can schedule to refresh this image, weekly, starting 11/20/2021 at 12:00 every Saturday
You can run scripted actions (for example, installing Microsoft Teams, Zoom client, etc.) along with the image refresh.
-
-
Select Run now (not scheduled) or Save & close (scheduled).
Link additional images form the Azure Marketplace
Nerdio Manager allows you to choose additional images from the Azure Marketplace, enabling you to refresh using one of these additional images.
Note: These images have not been certified by Nerdio for compatibility.
To link an additional image from the Azure Marketplace:
-
Navigate to Settings
-
Select from the following:
-
Classic UI: Select Azure environment, and then scroll down to the Marketplace Images tile.
-
New UI: Select Environment, and then select the Azure tab. Scroll down to the Marketplace Images section, and select the down arrow to expand the section.
-
-
Select Link.
-
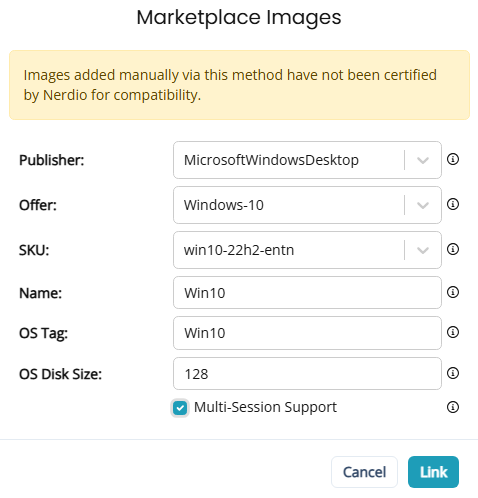
Enter the following information:
-
Publisher: From the drop-down list, select the publisher. Choose from MicrosoftVisualStudio, MicrosoftWindowsDesktop, or MicrosoftWindowsServer
-
Offer: From the drop-down list, select the VM image
-
SKU: From the drop-down list, select the SKU.
-
Name: Enter a name for the image,
-
OS Tag: Enter an OS tag for the image,
-
OS Disk Size: Enter the disk size for the image.
-
Multi-Session Support: Select if you want to enable multi-session support for this image.

-
-
Select Link.