FSLogix settings and configuration
The FSLogix profile container is based on two components:
-
Installation of the FSLogix application (https://aka.ms/fslogix_download)
-
Configuration of the FSLogix via GPO or registry. For more information, see this Microsoft article.
Nerdio Manager automatically installs the FSLogix application, by default, when a new session host VM is created, or an existing one is re-imaged. This is the most common use case.
Create an FSLogix profiles storage configuration
Nerdio Manager allows you to create FSLogix Profiles storage configurations.
To add an FSLogix Profiles storage configuration:
-
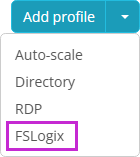
Navigate to Settings > Profile Management.
-
Classic UI: From the bottom right-hand side, select Add profile, and from the menu options, select FSLogix.
-
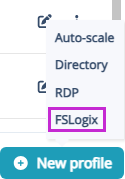
New UI: From the bottom right-hand side, select New profile, and from the menu options, select FSLogix
-
-
In the FSLogix Profiles storage tile, select Add.
-
Enter the following information:
-
Name: Type the profile name.
-
Version From the drop-down list, select the FSLogix version.
-
Use Cloud Cache: Select this option to enable FSLogix Cloud Cache.
Tip: For performance reasons, it is strongly recommended that you use Premium SSD and Ephemeral OS disks when Cloud Cache is enabled. (Standard SSD disks might be sufficient in very small environments or a testing scenarios.)
Note: See the following Microsoft article for more information about FSLogix Cloud Cache.
Cloud Cache allows you to specify multiple profile storage location. It asynchronously replicates the profiles and makes the profiles available in multiple storage locations at the same time. So, if one of the locations is not available, the session host automatically fails over to one of the alternate locations.
-
Configure session hosts registry for Entra ID joined storage: Select this option to enable Entra ID Kerberos functionality and Entra ID account credentials loading.
Note: See this Microsoft article for more information.
-
Exclude the local admin accounts from FSLogix: Select this option to prevent local admins profiles creation in FSLogix storage location.
-
Exclude domain account from FSLogix: Select this option to prevent domain account profiles from being created in the FSLogix storage location, and then enter the domain details in the box below.
Note: When FSLogix is having issues on a session host, there is still a way to sign in with an excluded user for troubleshooting purposes.
-
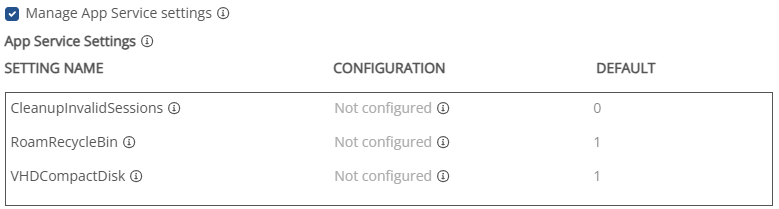
Manage App Service settings: Select this option to edit the FSLogix App Service Registry settings.
-
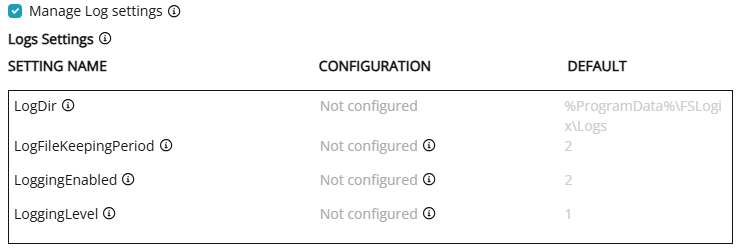
Manage Log settings: Select this option to manage log settings.
-
FSLogix Profiles path (VHDLocation): From the drop-down list, select an Azure Files share. Alternatively, type in a UNC path.
Note: You can specify up to 4 paths. In addition, use the arrows to change the order of the paths. The profiles are created in all of these locations.
-
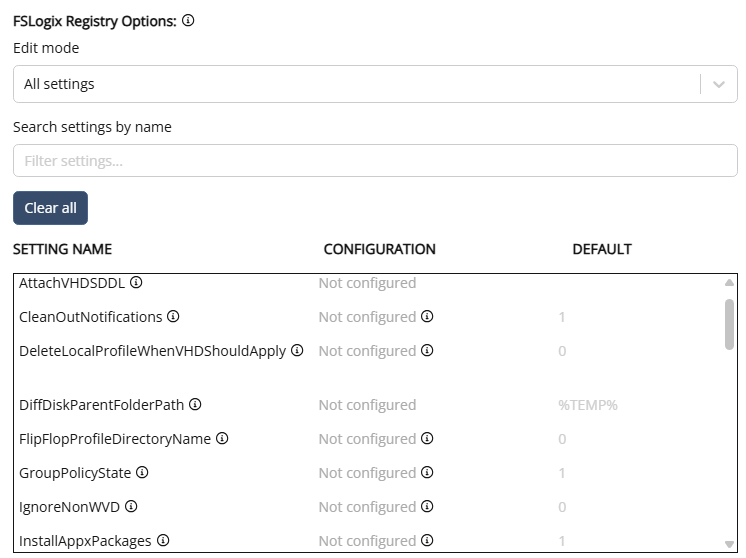
FSLogix Registry Options: From the Edit mode drop-down list, select whether you want to work with All settings or Advanced.
-
For All settings:
-
In the Configuration column, enter the setting's value.
-
Select Clear to set a specific setting to Not configured.
-
Select Clear all to set all the settings to Not configured.
-
-
For Advanced:
-
You can add DWORD values in the format: "ValueName":dword:ValueData. For example: "ProfileType"=dword:00000003.
-
You can add string values in the format: "ValueName":"ValueData". For example: "VolumeType":"vhdx".
-
-
-
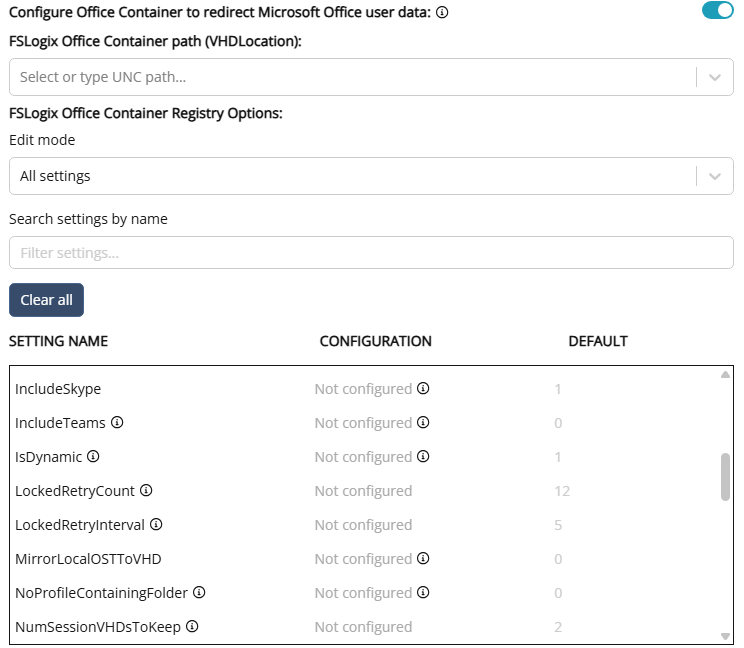
Configure Office Container to redirect Microsoft Officer user data: Toggle on this option to redirect only areas of the profile that are specific to Microsoft Office.
Note: Office Containers separate Microsoft Office data (for example, OST files) from the overall user profile for easier troubleshooting. Office Containers and Profile Containers are stored in separate VHDX files can be stored on different file shares. See this Microsoft article for details.
-
FSLogix Office Container path (VHDLocation): Modify as needed.
-
FSLogix Office Container Registry Options: From the Edit mode drop-down list, select whether you want to work with All settings or Advanced, and then configure the settings as required.
-
-
Redirections: Toggle this option on if you want to include Redirections in the global profile for re-use across customers.
Note: See this Microsoft article for more information about redirections.
-
Force the installation of FSLogix apps even if already installed: Select this option to force the re-installation of the FSLogix agent and applications.
-
-
Once you have entered all the desired information, select OK.
Set an FSLogix profiles storage configuration as default
Nerdio Manager allows you to set one FSLogix Profiles storage configuration as the default.
To set Nerdio Manager to install the FSLogix application automatically:
-
Navigate to Settings > Integrations.
-
In the FSLogix Profiles storage tile, add, change, and remove the profiles as needed.
Notes: Be sure to select the following options for FSLogix profiles linked to hybrid host pools.
-
Use Cloud Cache: Select this option to enable FSLogix Cloud Cache in the host pools, and the session hosts within those host pools, that use this FSLogix profile.
-
Use Azure page blobs: Select this option to use storage account blob containers to store users profiles. These containers are accessed using storage account access keys.
-
-
Locate the desired FSLogix Storage configuration profile and select set default.
Notes:
-
If you set the Use FSLogix Profiles option to Off, the FSLogix app is installed automatically when new hosts are created or re-imaged.
-
Each host pool's FSLogix settings can be customized.
-
FSLogix is not installed on the desktop image.
-
The FSLogix registry settings are not set on the desktop image.
-
Session hosts should not receive conflicting FSLogix configurations from GPOs.