Nerdio Manager Installation Guide
This section guides you through the process of installing Nerdio Manager in your Azure subscription and initializing Nerdio Manager.
By following these steps, you are registering an Enterprise application in your own Azure tenant, in a subscription that you select, inside a new resource group, or an existing resource group as long as it's empty. Once the installation is complete, you receive a URL to sign in to the Nerdio Manager web application.
Nerdio Manager is installed and billed through the Azure Marketplace.
The installation process can be broken down into the following phases:
-
Confirm you meet the prerequisites before you start installing Nerdio Manager.
-
Install the Nerdio Manager application from the Azure Marketplace.
-
Initialize the installation by running an Azure PowerShell script.
-
Register your installation with our licensing servers and configure the Nerdio Manager settings.
Companion video
Prerequisites
Note: Before starting the installation process, sign in to your Azure portal as a Global Administrator, or Privileged Role Administrator and Cloud Application Administrator.
-
You must be a subscription Owner of an Azure subscription where you need to install the Nerdio Manager from the Azure Marketplace.
-
The Azure subscription must support the deployment of Azure SQL, App Service, Key Vault, Application Insights, and Automation Account in the Azure region you select during the installation process.
-
You should have a virtual network and a subnet available to deploy AVD session host VMs. You are prompted to select this virtual network and subnet during the configuration phase.
-
When using Active Directory or Entra DS, the custom default DNS server setting, specified on the virtual network subnet, must point to either a domain-aware DNS server or an Azure DNS zone.
-
When using Windows Active Directory Domain Services (ADDS), ADDS must be synchronized with Entra ID.
-
When using Active Directory, you need a user account with permissions to join and unjoin VMs from the domain. This user account must be able to create computer objects in at least one OU in the AD domain and be able to disable those computer objects as needed.
-
You need an SMB file storage location for FSLogix Profile containers. This SMB share can be on a file server VM, Azure Files, Azure NetApp Files, or any other location accessible via a UNC path (for example, \\server.domain.local\share\profiles). The server name must be in FQDN format.
-
To ensure best performance, locate the profile storage in the same Azure region as the host pool VMs.
-
If you don't have a file storage location available, this step can be skipped during installation, and Nerdio Manager can create Azure Files or NetApp Files after the configuration.
-
-
The Microsoft Desktop Virtualization resource provider must be registered in your Azure subscription.
Install Nerdio Manager from the Azure Marketplace
Nerdio Manager is installed from the Azure Marketplace.
To install Nerdio Manager:
-
In the Azure Marketplace, search for Nerdio Manager for Enterprise.
-
Select Create > NME Plan to start the installation process.
The Create NME Plan page opens.
-
On the Basics tab, enter the following information:
- Subscription: From the drop-down list, select the subscription where you want to install Nerdio Manager.
-
Resource Group: Select Create new to create a new resource group. Alternatively, you can select an existing resource group, as long as it's empty.
-
Region: From the drop-down list, select the region closest to you or where the majority of your administrators are located.
Note: This region is where the Nerdio Manager resources are located, and does not determine the location of the AVD session hosts themselves.
-
Select Next.
-
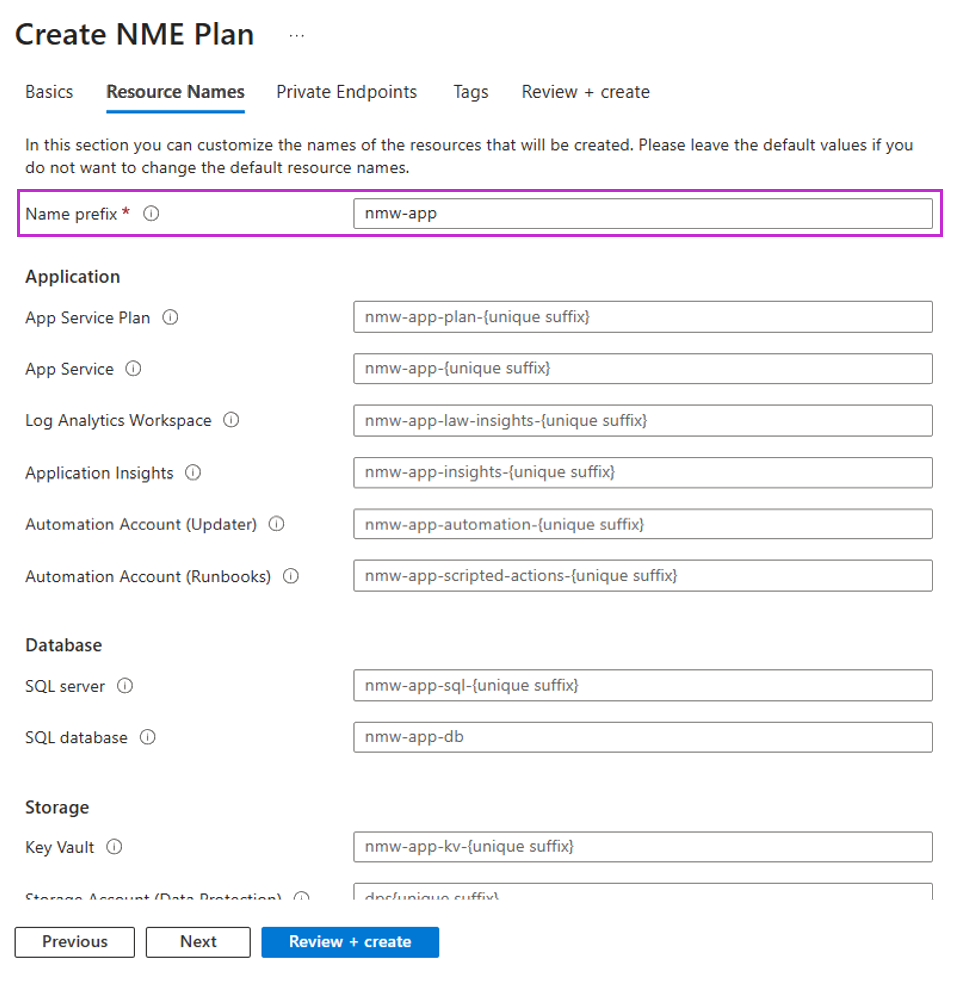
On the Resource Names tab, do the following:
-
Name prefix: Customize the prefix used for resource names.
-
Select Next.
-
-
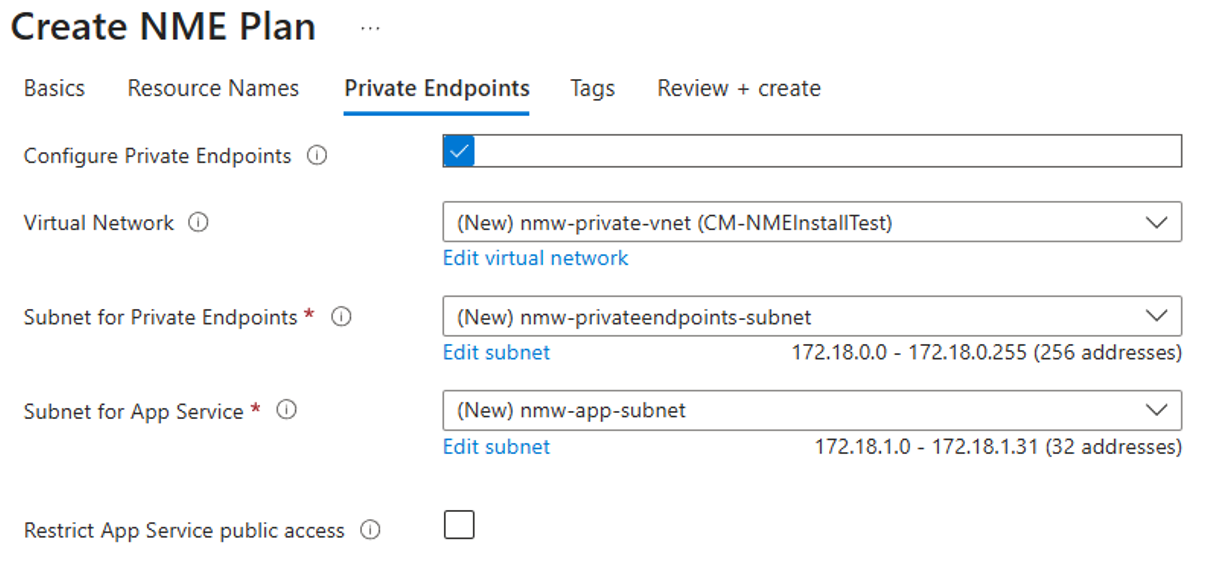
On the Private Endpoints tab, specify if this install should use private endpoints and restrict Nerdio Manager from being publicly available.
Enter the following information:
-
Enable Private Endpoints: Enable this option to configure Nerdio Manager to use private endpoints.
Note: If Nerdio Manager is configured to use private endpoints, the application and its dependencies (SQL Database, Storage Account, Key Vault, App Service, etc.) are no longer reachable through their public internet endpoints. Instead, access is restricted to the customer’s virtual network through private IP addresses. You can customize the virtual network and subnet for private endpoints, as well as for the App Service, but this is typically not required.
-
Virtual Network: From the drop-down list, select the VNet where Nerdio Manager resources will reside.
-
Subnet for Private Endpoints: From the drop-down list, select the subnet that will host the private endpoints.
-
Subnet for App Service: From the drop-down list, select the subnet dedicated to the App Service.
-
Restrict App Service public access: Leave this option unselected.
Note: If you enable Restrict App Service public access, Nerdio Manager will not be available after deployment. Additional manual network configuration will be required.
-
Select Next.
-
-
On the Tags tab, review any custom tags that may be needed, and then select Next.
Tip: You can skip this tab.
-
On the Review + Create tab, review your selections and select Create.
Note: A confirmation window is displayed, informing you that the deployment is in progress. The deployment usually takes about 10 minutes.
-
When the deployment is complete, select Go to resource group.
-
Locate and select the App Service.
Initialize Nerdio Manager
When Nerdio Manager for Enterprise is deployed to your Azure subscription, the following steps must be performed to initialize your installation of Nerdio Manager.
Note: If you wish to use Entra ID app registration or split identity, skip to To initialize Nerdio Manager (Entra ID app registration or split identity): .
To initialize Nerdio Manager (typical):
-
Open the Nerdio Manager URL from the App Service by selecting either the Browse button or the domain link on the Overview tab.
-
Select the copy button to copy the command.

-
Select Launch Azure Cloud Shell, and then sign in as the Global Administrator, or Privileged Role Administrator combined with Cloud Application Administrator, and the subscription Owner.

-
If required, select PowerShell (not Bash) and create a storage account for the shell history.
-
Paste the PowerShell command and press Enter.
Note: Several commands flash by. The script should take about 10 minutes to run.
-
When the script is completed, you are returned to the prompt. The message Deployment completed successfully is displayed.

-
Select the URL in the confirmation message. Alternatively, return to the open tab in the browser and refresh the page. You are now ready for the next phase of the installation process - Configure Nerdio Manager settings.
To initialize Nerdio Manager (Entra ID app registration or split identity):
-
Sign in to the Nerdio Manager web application as the Global Administrator, or Privileged Role Administrator combined with Cloud Application Administrator, and the subscription Owner.
-
Select Show advanced.
-
For Entra ID app registration:
-
Use existing Entra ID app registration: Select this option.
-
App ID: Type the App ID.
-
App Secret: Type the App secret.
-
Service Principal ID: Type the service principal ID.
-
-
For Split Identity:
-
Split Identity: Select this option.
-
Identity Tenant ID: Type the identity tenant ID.
-
-
Select Download script (Az).
-
From your local machine, locate and run the downloaded script.
-
Select the URL in the confirmation message. Alternatively, return to the open tab in the browser and refresh the page. You are now ready for the next phase of the installation process.
Configure Nerdio Manager settings
Nerdio Manager is now installed. The next step is to configure various application settings.
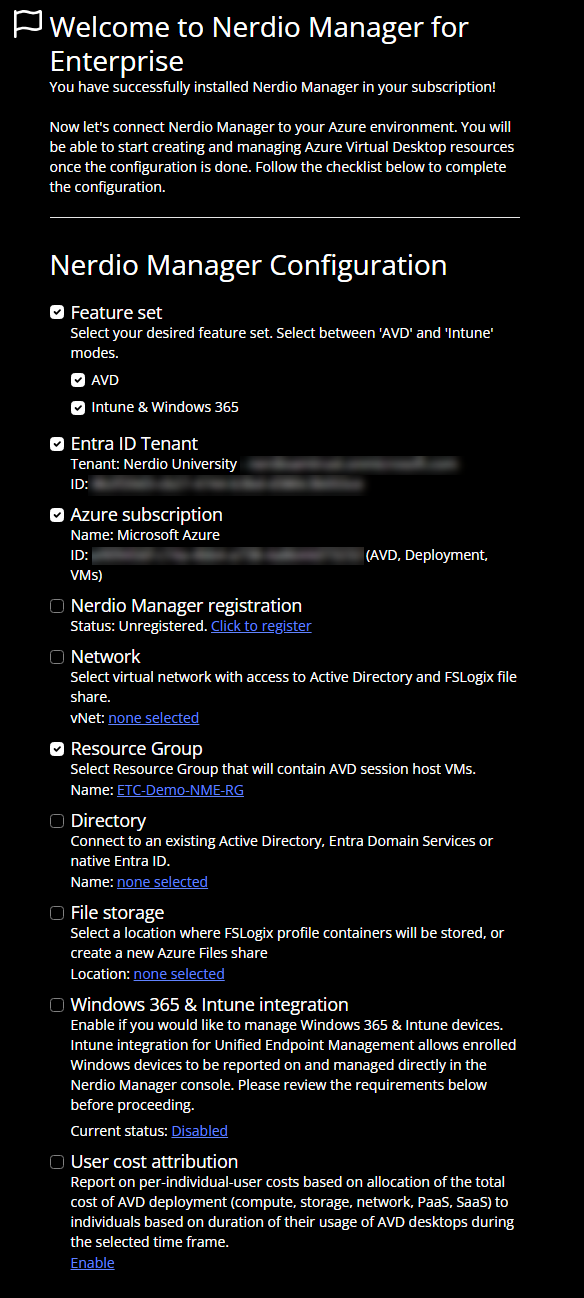
When you navigate to the URL, you see a window similar to this:
To configure the Nerdio Manager settings:
-
In the Nerdio Manager registration section:
-
Select Register Nerdio Manager.
-
Enter your registration information.
-
Once you have entered all your registration information, select Register.
-
-
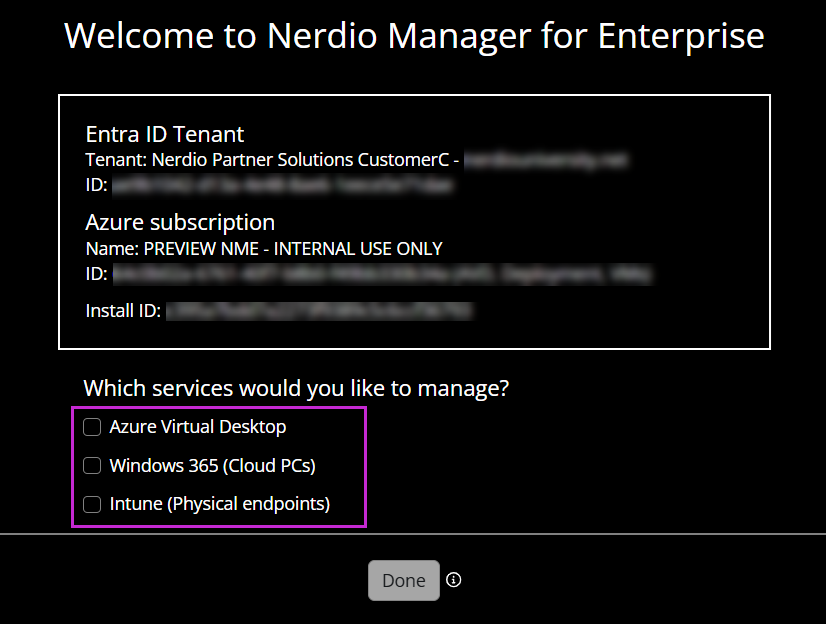
In the Feature set section, select your desired feature set:
-
Azure Virtual Desktop
-
Windows 365 (Cloud PCs)
-
Intune (Physical endpoints)
Note: You can set up one, two, or all feature sets at the same time.
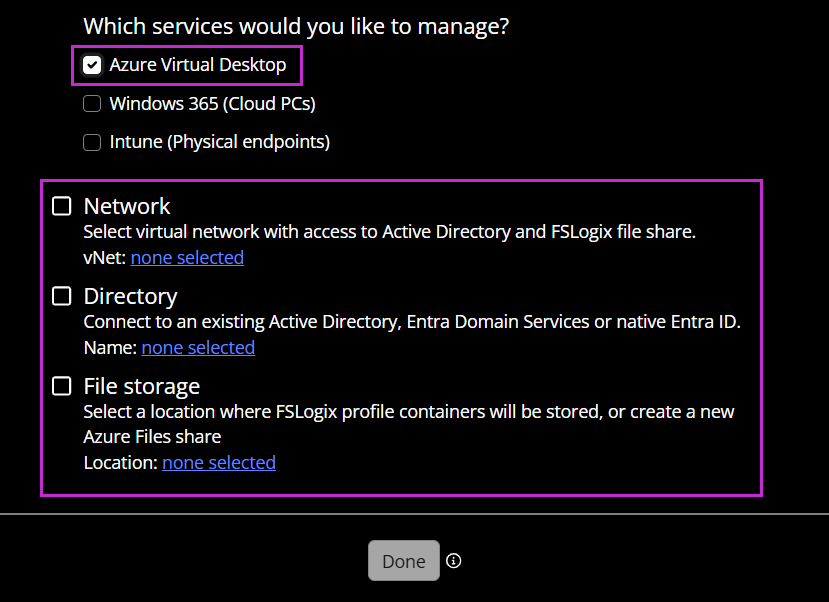
Selecting Azure Virtual Desktop exposes the following configuration options:
-
In the Network section:
-
Select none selected.
-
Subnet: From the drop-down list, select the subnet.
-
Select OK.
-
-
In the Directory section:
Note: The Active Directory, Entra Domain Services, or native Entra ID user account must have permission to create computer objects in the domain. Nerdio Manager uses these credentials when joining computers to the domain.
In addition, when using Active Directory, the user account needs some extra permissions to join Azure Files shares to the directory.
-
Select none selected.
-
Enter your Active Directory, Entra Domain Services, or Entra ID information.
-
Once you have entered all the desired information, select OK.
-
-
-
In the File storage section:
Note: You can provide your FSLogix file storage information or a UNC path to an existing file share accessible from the VNet. If you don't have a file share ready, select the option to skip this step.
-
Select none selected.
-
Skip this step for now: Select this option to skip this step and configure the file storage later.
-
FSLogix: Select the FSLogix version. Default is the latest version.
-
Use Cloud Cache: Select this option to enable FSLogix Cloud Cache in the host pools, and the session hosts within those host pools, that use this FSLogix profile.
Tip: For performance reasons, it is strongly recommended that you use Premium SSD and Ephemeral OS disks when Cloud Cache is enabled. Standard SSD disks might be sufficient in very small environments or for testing scenarios.
Note: Cloud Cache allows you to specify multiple profile storage locations. It asynchronously replicates the profiles and makes the profiles available in multiple storage locations at the same time. So, if one of the locations is not available, the session host automatically fails over to one of the alternate locations.
For more information about FSLogix Cloud Cache, see Cloud Cache Overview.
-
Configure session hosts registry for Entra ID joined storage: Select this option to enable Entra ID Kerberos functionality and Entra ID account credentials loading.
Note: For more information, see Configure the session hosts.
-
Manage App Service settings: Select this option to edit the FSLogix App Service registry settings.
-
Manage Log settings: Select this option to edit the FSLogix log registry settings.
-
FSLogix Profiles path (VHDLocation): From the drop-down list, select an Azure Files share or Azure NetApp Files volumes. Alternatively, enter a UNC path.
Note: You can specify up to 4 paths. In addition, use the arrows to change the order of the paths. The profiles are created in all of these locations.
-
Once you have entered all the desired information, select OK.
-
-
Optionally, enable Windows 365 & Intune, and then configure the features and scopes:
-
Select configure.
-
Enable the required configuration features.
-
Select OK.
-
Note: For details about enabling Windows 365 in Nerdio Manager, see Windows 365 - Enable and Configure Cloud PCs.
To complete the installation process:
-
Once you have configured all the settings noted above, select Done.
-
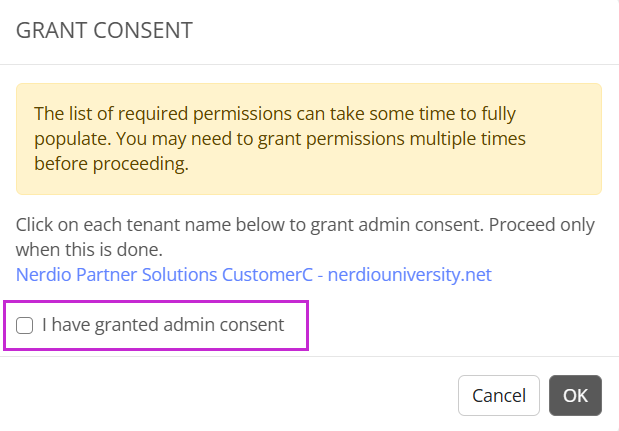
Select the link of the tenant that is provided.
-
Sign in as a user with the Global Administrator role, then review and accept the consent.
-
Navigate back to Nerdio Manager and select I have granted admin consent.
-
Select OK.
Note: If there are any errors, please repeat the consent steps. It sometimes takes several minutes. You can retry it a few times until the consents are validated.
The installation is now complete, and you are ready to start using Nerdio Manager.