Role-based access control (RBAC) in Nerdio Manager
You can use role-based access controls (RBAC) to allow users in your organization to sign in to Nerdio Manager and control which actions they can perform once signed in.
The following roles are available:
-
AVD Admin: A user with the AVD Admin role has complete access to all areas of Nerdio Manager. Only AVD Admins can manage users and roles.
-
Desktop Admin: A user with the Desktop Admin role has complete access to user sessions, the ability to view Host Pools, power on/off/restart session hosts, but does not have the ability to add/remove hosts or change any host pool settings. This role also allows for full access to Desktop Images and Scripted Actions.
-
Help Desk: A user with the Help Desk role has access to manage user sessions only.
-
Reviewer: A user with the Reviewer role has view-only access to all areas of Nerdio Manager. They cannot make edits and save changes.
-
End User: A user with the End User role can view and manage their own sessions (message, sign out, disconnect). Personal desktop users can restart, power off, and power on their personal desktops.
For more information about custom roles, see Role-based access control (RBAC): Custom roles.
Companion Video
Users and roles management
Nerdio Manager enables you to view the configured role based access role assignments.
To show RBAC role assignments:
-
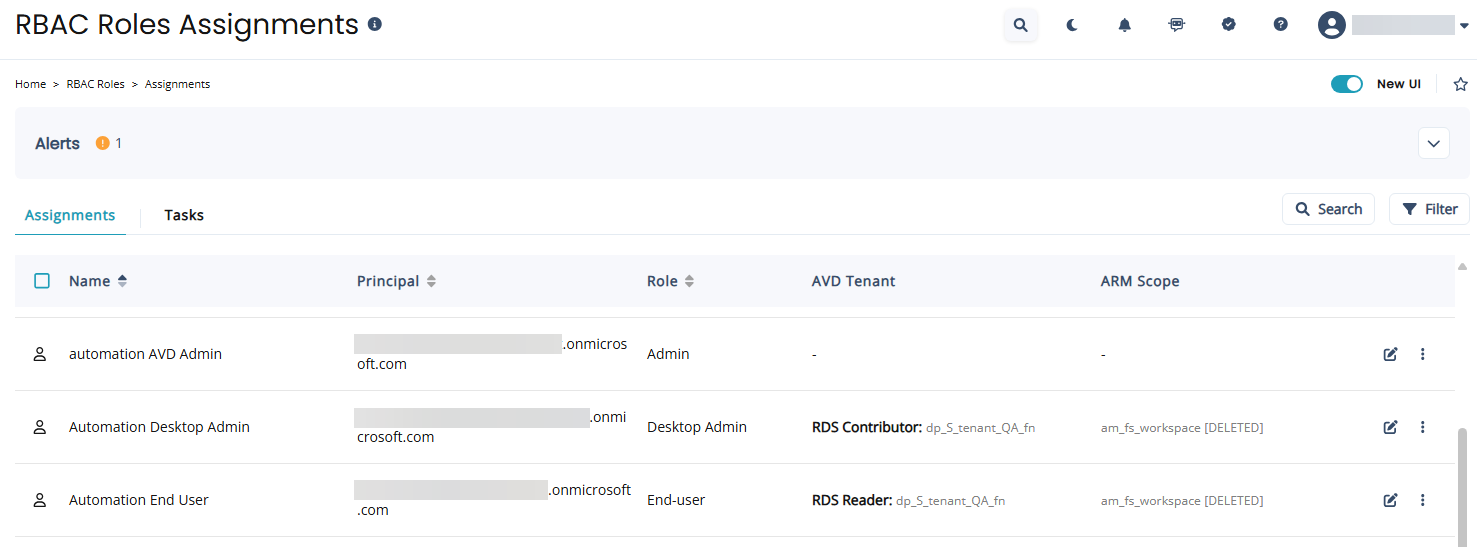
Navigate to RBAC Roles > Assignments. The list of users is displayed, with the view depending on UI version.
-
Classic UI: Example of the RBAC roles assignments for the classic UI:

-
New UI: Example of the RBAC roles assignments for the new UI:

-
Notes:
-
The search section at the top allows you to search by various fields, including name, username, role, and Workspace.
-
You can have the system list up to 1,000 rows on a single page. This is particularly useful when you are looking at a list of end users, which can often be hundreds or thousands.
-
Select the down arrow next to Editto display an action menu.
Add users to roles
You can add users to oles/Workspaces.
To add users to Roles/Workspaces:
-
Navigate to RBAC Roles > Assignments.
-
Select from the following:
-
Classic UI:In the upper right side, select the add new
 icon or select the Add button.
-
New UI:Select New Assignment.

-
-
In the Add Role dialog box, enter the following information:
- Role: From the drop-down list, select a role.
-
Users/Groups: From the drop-down list, select the users/groups you wish to grant access to.
-
AVD Tenant: From the drop-down list, select the AVD tenant(s) you wish to grant access to.
-
Workspace: For Workspaces roles, from the drop-down list, select the Workspace(s) the user should have access to.
-
Images: For Desktop Images roles, from the drop-down list, select the Desktop Image(s) the user should have access to.
-
Host Pools: For Host Pool roles, from the drop-down list, select the Host Pools(s) the user should have access to.
-
Once you have entered all the desired information, select OK.
Notes:
-
The changes are logged as a task. You can review the task's status to ensure the task completed successfully.
-
Once access has been granted, users may sign in to Nerdio Manager using their Entra ID username and password. Simply share the URL for Nerdio Manager from your browser's address bar with the user. If MFA is being enforced, the user needs to go through the MFA process while signing in.
-
Edit a user's role
You can change a user's role or the Workspaces the user has access to.
To edit a user:
-
Navigate to RBAC Roles > Assignments.
-
Select from the following:
-
Classic UI: Locate the user you wish to edit, and from the action menu, select Edit.
-
New UI: Locate the user you wish to edit, and select the edit
 icon.
icon.
-
-
Once you have made the changes, select OK.
Note: The changes are logged as a task. You can review the task's status to ensure the task completed successfully.
Remove user access
You can prevent a user from accessing Nerdio Manager by removing the user's access.
To remove a user's access:
-
Navigate to RBAC Roles > Assignments.
-
Select from the following:
-
Classic UI: Locate the user you wish to remove access from, and from the action menu, select Remove access.
-
New UI: Locate the user you wish to remove access from, and from the more actions
 menu, select Remove access.
-
-
-
On the confirmation window, select OK.
Note: The changes are logged as a task. You can review the task's status to ensure the task completed successfully.