Create dynamic host pools
Warning: Nerdio Manager does not install the BgInfo Azure extension during any automation or management process. However, the BgInfo extension may be installed either through a scripted action directly, or unintentionally, as stated in the Azure PowerShell module issues report.
The following procedure allows you to create a new dynamic host pool.
To create a new dynamic host pool:
-
Navigate to Workspaces.
-
Select the workspace you wish to work with.
-
Navigate to Workspaces > Dynamic Host Pools.
-
Select Add dynamic host pool.
-
Enter the following information:
Note: For several of the required parameters, you may filter the available choices by using the Resource Selection Rules. For example, you may filter the VM Size or OS Disk choices for Intel RAM-optimized VMs only. See Resource Selection Rules Management for details.
-
Name: Enter the name of the host pool.
-
Description: Enter the host pool's description.
Note: Optionally, select Generate using AI to have AI create the description. See Overview of AI-Powered Description Generation for details.
-
Resource Group: From the drop-down list, select the resource group for the host pool.
-
Desktop Experience: From the drop-down list, select the desktop experience.
Note:
-
Multi user desktop (pooled): This is the full desktop experience. Users are not assigned to individual session hosts and are placed on a host based on its load. Multiple users are pooled together on a group of hosts.
-
Multi user RemoteApp (pooled): This is only published applications, not a full desktop experience. Published RemoteApps are visible to users as native apps running on their local computer. The RemoteApps are provided by a collection (pool) of session hosts.
-
Single user desktop (pooled): This is the full desktop experience. Users are placed on individual desktop VMs (one user per session host) and a preconfigured number of spare(available) desktops is maintained.
-
Single user desktop (personal): This is a personal (persistent) full desktop experience. A dedicated session host VM is assigned to each user.
-
-
When you select AVD single-session desktop (personal) as the Desktop Experience, you need to configure the following additional features:
-
Assignment Type: Select how the desktop is assigned to the user.
Note: Before users can sign into a personal desktop, they need to be pre-assigned to the VM.
-
Optionally, select Assign multiple desktops to a single user.
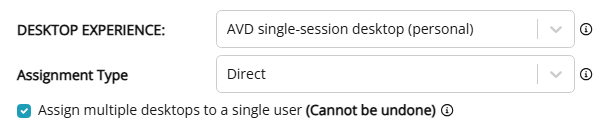
Note: Selecting this option allows multiple desktops to be assigned to a single user for this host pool. This setting CANNOT be disabled after being enabled, and is only available for direct assignments. For more details, see Configure personal desktop assignment.
-
-
Directory: From the drop-down list, select the directory.
Note: The default option is the global default Nerdio Manager AD configuration. To use a custom configuration for the host pool, select the Custom option.
-
FSLogix: From the drop-down list, select the FSLogix configuration profile to be used when creating or re-imaging hosts in this host pool.
-
RDP Profile: From the drop-down list, select the RDP profile.
-
Name: Type the name of the newly added hosts for Prefix or the Prefix+Pattern.
-
Prefix/Pattern: From the drop-down list, select whether to use a Prefix or a Pattern.
Note:
-
Prefix can be used when creating multiple session hosts. The Prefix limit is 10 valid, Windows computer name characters. When using a Prefix, a unique suffix is automatically appended in the format "-xxxx", where xxxx are 4 random alphanumeric characters. For example: AVDHOST-s72h. Do not add a "-" to the Prefix.
-
Pattern can be used to specify an advanced naming convention for new hosts. Pattern characters must be enclosed in {} and can be # (for sequential numbers) and/or ? (for random alphanumeric characters). One # implies numbers from 0 to 9, two #s implies numbers of 0 to 99, etc.
-
Example 1: AVDHOST{###} (AVDHOST000..AVDHOST999).
-
Example 2: AVDHOST-{???} (AVDHOST-d83, AVDHOST-7sl, etc.).
-
-
-
-
Network: From the drop-down list, select the network. The network determines the Azure region of the VM.
Note: Nerdio Manager verifies that there is a sufficient number of available IP addresses on the selected network before deploying new host pool VMs. If there are insufficient available IP addresses, an error message is displayed and you may not add the new host pool.
-
Desktop Image: From the drop-down list, select the desktop image that is used as the golden image for newly created session hosts.
-
VM Size: From the drop-down, select the VM disk size and type for newly created session hosts.
Note: If any VM size is not available for a subscription or region, it doesn't appear in the list. At times, even if a VM size is available in a specific Azure region, it cannot be used due to the subscription having restrictions on a particular size. In such cases, we show the VM size in the drop-down list, but don't allow users to select it (the size is disabled).
-
OS Disk: From the drop-down list, select the OS Disk type and size for newly created session hosts.
Note: This must be equal to or larger than the size of the Desktop Image selected above. Using Standard HDD (S-type) is not recommended. Premium SSD provides best performance.
-
Resource Group: From the drop-down list, select the resource group to contain the VMs.
- Quick Assign: From the drop-down list, select the users or groups to pre-assign to newly created desktops.
Note: The number of users specified cannot exceed the number of hosts being added. User assignment can be modified after the host pool is created.
-
Apply tags: Optionally, type the Name and Value of the Azure tag to apply to the host pool.
Note: You may specify multiple tags. See this Microsoft article for details about using tags to organize your Azure resources.
-
Add "cm-resource-parent" tag: Select this option to add the "cm-resource-parent" tag to the host pool.
-
-
App group settings: Optionally, type the App group name of the host pool.
-
Application policies: Optionally, select the application policies to assign to the host pool.
-
Validation environment: Select this option to receive service updates at a faster cadence than non-validation host pools, allowing you to test service changes before they are deployed broadly to production.
-
-
Once you have entered all the desired information, select OK.
-
The auto-scale configuration window displays. If desired, configure the auto-scaling for the host pool. See Enable dynamic host pool Auto-scaling for more information.
The process of host pool creation begins. If auto-scaling has been enabled, it may take some time to complete. Otherwise, the host pool is created immediately. This creates an "empty" host pool – there are no session hosts in that host pool. An end-user who attempts to connect to the empty host pool is informed that there are no resources (that is, session hosts) to serve up a desktop. You can monitor progress in the Host Pools Tasks section.
Enable dynamic host pool Auto-scaling
Create static host pools without auto-scaling
Delete Hosts, Host Pools, and Workspaces