Enable personal host pool Auto-scaling
Nerdio Manager allows you to perform auto-scaling on personal host pools. This enables you to do the following:
-
Personal desktops can be automatically powered on and off based on a schedule. Alternatively, personal desktops can be stopped when there are no active or disconnected sessions.
-
The host OS disk type can be changed to a lower priced storage type when the personal desktop is not running.
-
Auto-healing automatically attempts to repair "broken" session hosts. In addition, it allows scripted actions, such as SxS re-install or AVD host re-register, to be executed against them.
To configure the basic auto-scale information:
-
Locate the personal host pool you wish to work with.
-
From the more options
 menu, hover over Auto-scale , and select Configure.
 -
At the bottom of the page. toggle Auto-scale to Enabled.

-
Enter the following basic auto-scale information:
-
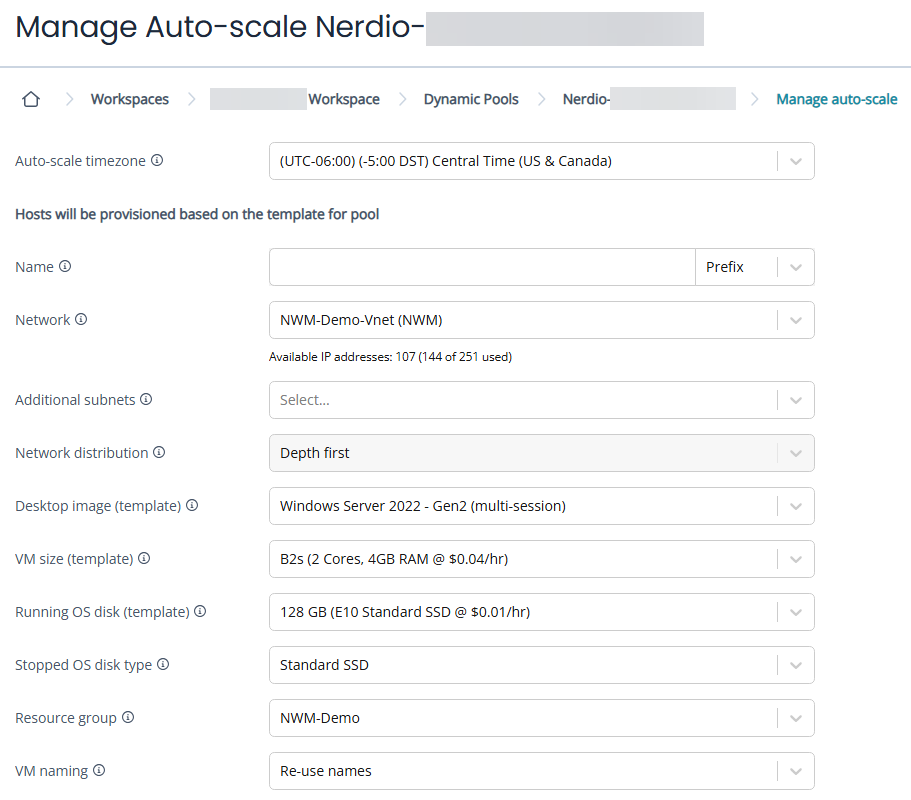
Auto-scale timezone: From the drop-down list, select the time zone for the auto-scale process.
-
Name: Type the name of the newly added hosts for Prefix or the Prefix+Pattern.
-
Prefix/Pattern: From the drop-down list, select whether to use a Prefix or a Pattern.
Note:
- Prefix can be used when creating multiple session hosts. The Prefix limit is 10 valid, Windows computer name characters. When using a Prefix, a unique suffix is automatically appended in the format "-xxxx", where xxxx are 4 random alphanumeric characters. For example: AVDHOST-s72h. Do not add a "-" to the Prefix.
-
Pattern can be used to specify an advanced naming convention for new hosts. Pattern characters must be enclosed in {} and can be # (for sequential numbers) and/or ? (for random alphanumeric characters). One # implies numbers from 0 to 9, two #s implies numbers of 0 to 99, etc.
-
Example 1: AVDHOST{###} (AVDHOST000..AVDHOST999).
-
Example 2: AVDHOST-{???} (AVDHOST-d83, AVDHOST-7sl, etc.).
-
-
- Network: From the drop-down list, select the network the VM connects to.
Note: The VM that is created on the selected network is created in the Azure region associated with the network.
-
Additional subnets: From the drop-down list, select an additional subnet from the same virtual network.
Note: When scaling out, if a particular subnet does not have enough IP addresses, the next subnet will be chosen automatically when creating additional session hosts.
-
Network distribution: From the drop-down list, select how the network load should be distributed. Select either Depth first, or Breadth first.
Note: Select Depth first to distribute network load to nodes one after another in a fixed order, or select Breadth first to balance the network load proportionally based on current resource usage.
-
Desktop image (template): From the drop-down list, select a desktop image to be used as the golden image for new session hosts.
-
VM size (template): From the drop-down list, select the VM size for new session hosts.
-
Running OS disk (template): From the drop-down list, select the OS disk type and size for new session hosts.
-
Stopped OS disk type: From the drop-down list, select the OS disk type when session host VMs are stopped.
-
Resource group: From the drop-down list, select the resource group where VMs should be created.
-
VM naming: From the drop-down list, select the VM naming to use.
Note: Host VMs that are created automatically by the scale out or auto-grow process use names based on the selected VM naming mode. See How Session Host VM Names are Generated for more information.
-
Re-use names: Always attempt to re-use names that were previously used in the pool, if available.
-
Standard names: Use the next available name.
-
Unique names: Always attempt to use a unique name for new hosts.
-
-
-
Select Default schedule or Alternative schedule.
Note:Nerdio Manager allows you to configure separate auto-scale settings for a default schedule (normal operations) and an alternative schedule (outside of normal operations). For example, you may want fewer session hosts available on weekends or bank holidays. Alternatively, you may want more session hosts available two weeks prior to a holiday period when you have a large number of contingent users. In either case, you would use the Alternative schedule tab to configure the auto-scale settings for those periods that are outside of normal operations.
-
To create an alternative schedule, select the Alternative schedule tab and enter the following information:
-
Schedule: Select the toggle to enable the alternative schedule.
-
Days: From the drop-down list, select the off-peak day(s).
-
Dates: Select the date field, and from the calendar that is displayed, select the date..
-
Select the plus
 icon to add another date, or select the minus
  icon to remove dates.
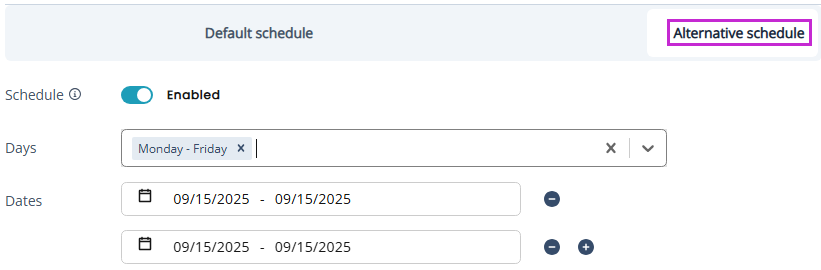
-
-
-
Auto-scale mode: From the drop-down list, select the desired auto-scale mode.
Notes:
- User-driven: The auto-scaling is performed when there are no active or disconnected sessions.
-
Schedule-based: The auto-scaling is performed as per the specified schedule.
-
Auto-scale profile: Optionally, from the drop-down list, select the auto-scale profile to use. Alternatively, select Custom to create a custom auto-scale configuration.
Note: See Manage Auto-scale Profiles for details about creating and working with auto-scale profiles.
-
Continue the configuration process with the relevant auto-scale mode:
-
User-driven: To enable user-driven personal host pool auto-scaling:
-
Schedule-based: To enable schedule-based personal host pool auto-scaling:
-
To enable user-driven personal host pool auto-scaling:
-
Auto-scale Mode: From the drop-down list, select the User-driven.
-
Enter the following Host pool properties information:
-
Start VM on connect: Select this option to start the desktop on connect.
-
-
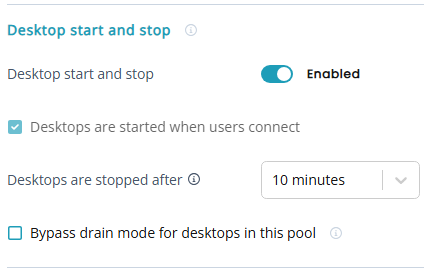
Enter the following Desktop start and stop information:
- Desktop start and stop: Toggle this option to enable desktop start and stop.
- Desktops are stopped after: From the drop-down list, select the number of minutes or hours to scale in after all users have signed out.
Notes:
Desktops are automatically started when users connect.
Desktops are automatically stopped only when there are no active or disconnected sessions. To automatically sign out disconnected users after a certain time, use the user session limits settings on the host pool properties.
- Bypass drain mode for desktops in this pool: Select this option so that desktops do not enter drain mode before shutdown.
-
- Enter the following Pre-stage hosts information:
- Pre-stagehosts: Toggle this option to enable pre-staging hosts.
Note: When pre-stage hosts is enabled it take precedence on other user-driven configuration. Stopped hosts will be started, hosts in drain mode will be activated, stopped disk types will be changed to running, and hosts will not be stopped or deactivated even if there are no user sessions.
- Select the box to include hosts without assigned users.
- Work days: From the drop-down list, select the workdays when large numbers of users log into their virtual desktops or applications at the same time.
- Start of work hours: Select the time in the morning when users start logging into their virtual desktops or applications.
- Scale in delay: Select a delay to restrict scale in operations after the start of work hours.
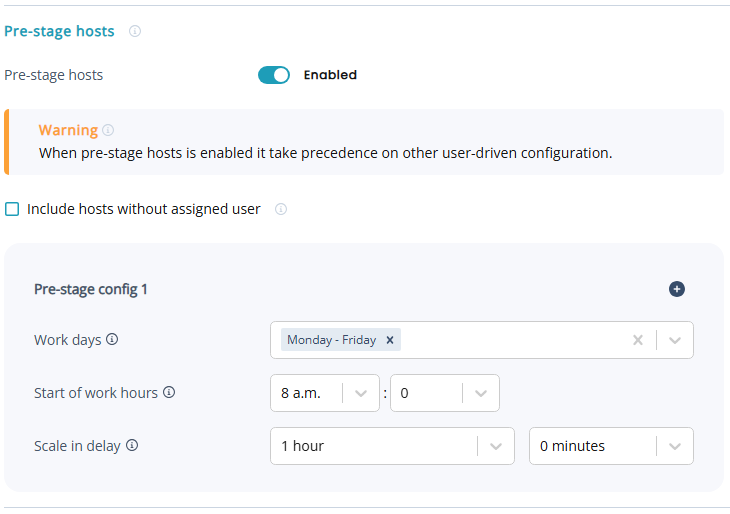
Note: Pre-staged hosts will not be scaled in during this time even if they are unused.
- Pre-stagehosts: Toggle this option to enable pre-staging hosts.
-
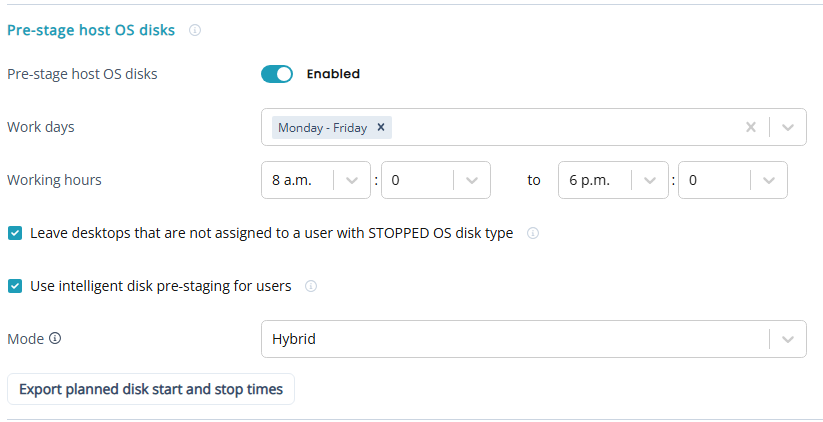
Enter the following Pre-stage Host OS Disks information:
Note: For more details and examples of intelligent disk pre-staging, see Intelligent disk pre-staging for personal host pools
-
Pre-stage host OS Disks: Toggle this option to enable pre-staging host OS disks.
-
From the drop-down lists, select the Days and Times the session host VMs' OS disks should be pre-staged.
-
Leave desktops that are not assigned to a user with STOPPED OS disk type: Select this option so that desktop VMs that are unassigned to a user do not have the OS disk converted from STOPPED to RUNNING.
-
Use intelligent disk pre-staging for users: Select this option to have intelligent disk pre-staging learn user behavior and automatically adjusts the disk pre-stage times.
Note: This feature requires AVD insights to be enabled and configured for the host pool.
-
Mode:When Use intelligent disk pre-staging for users is selected, from the Mode drop-down list, select the mode.
Note:
-
Hybrid Mode: Disks are always be pre-staged based on the defined schedule. The behavior of users whose work patterns are learned, and additional staging activity are scheduled. This function is designed as "learning mode," with the benefits of both the standard pre-stage functionality and learned requirements.
-
Automated Mode: Disks are pre-staged for existing users only according to the learned schedule. New users respect the defined schedule until Intelligent pre-staging has enough data to automate this process. Disks are pre-staged 30 minutes before anticipated user log on events.
-
-
-
-
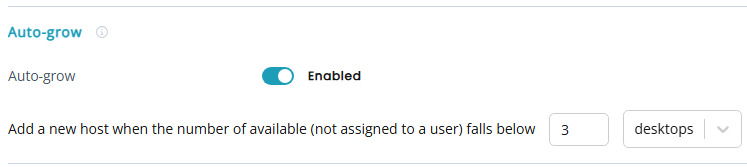
Enter the following Auto-Grow information:
Note: Automatically add desktops to the host pool when the number of unassigned desktops remaining falls below a specified threshold.
-
Auto-Grow: Toggle this option to enable auto-grow.
-
Add a new host when the number of available (not assigned to a user) falls below: Enter the threshold and from the drop-down list, select whether the threshold is a number of desktops or a percentage of total desktops.
-
-
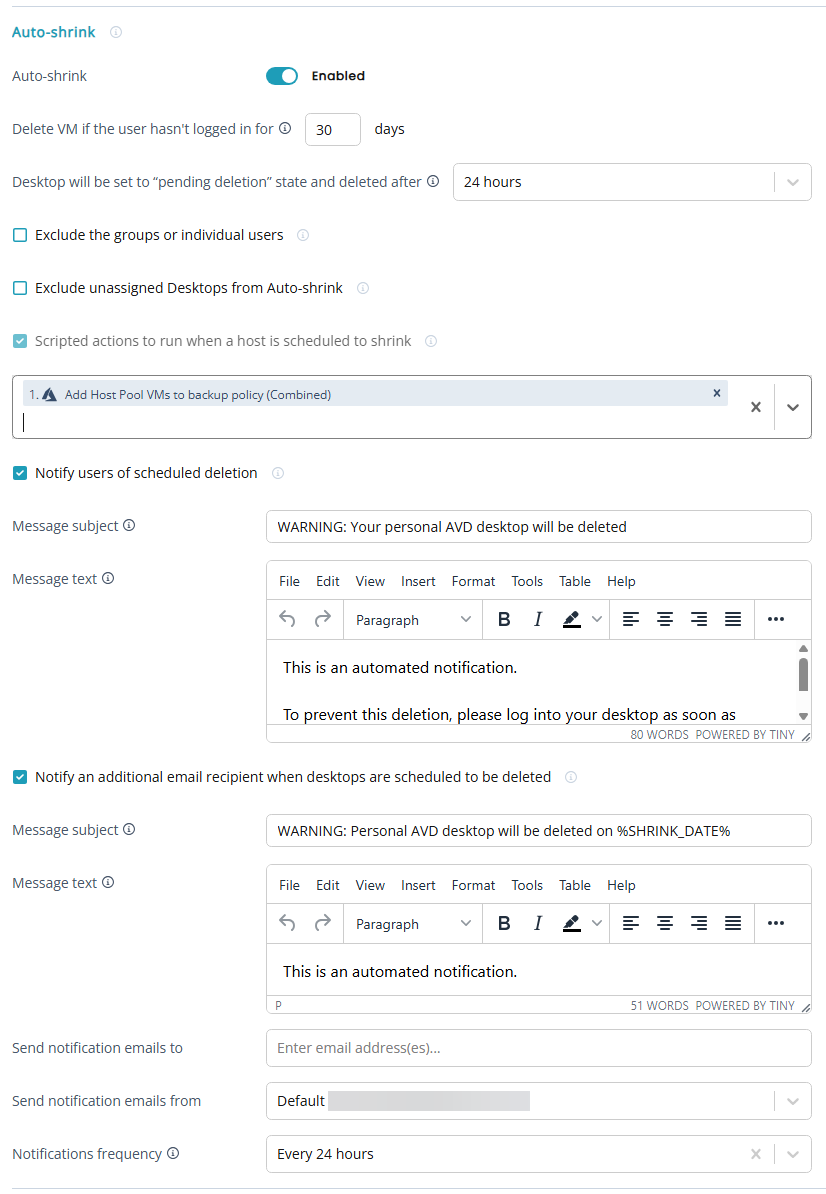
Enter the following Auto-shrink information:
Note: The system automatically remove desktops that have not been used in a long time.
-
Auto-shrink: Toggle this option to enable auto-shrink.
-
Delete VM if the user hasn't logged in for: Type the number of days to wait before the system automatically deletes the VM.
Note: User activity on this session host VM is determined based on Nerdio Manager auto-scale history and AVD diagnostics data. Each time the desktop is processed by auto-scale, an Azure tag with date/time the desktop was last used is set. If the desktop hasn't been used for the number of days specified in this setting, the session host VM is shut down and a "pending deletion" tag is set.
-
Desktop will be set to “pending deletion” state and deleted after: From the drop-down list, select time duration before a desktop is deleted..
Note: The desktop is set to "Pending deletion" state by the auto-scale process by adding a tag to the VM. A task is logged during this process, which can be used for admin notification of a desktop entering the "Pending deletion" state. There also are notification banners in the Nerdio Manager UI indicating that a personal host pool has VMs that are pending deletion. After the "pending deletion" period expires (default: 24 hours), the VM is permanently deleted.
-
Exclude the following groups (or individual users): Enable this option, and then select the group(s) or individual user(s) to exclude from auto-shrink.
Note: Desktops assigned to users listed here are not automatically removed, even after a prolonged time of inactivity.
-
Exclude unassigned Desktops from Auto-shrink: Select this option to exclude desktops that have not been assigned to a user from the auto-shrink operations.
Note: Use this setting in combination with Auto-Grow to maintain a buffer of free unassigned desktops.
-
Scripted actions to run when a host is scheduled to shrink: From the drop-down list, select the scripted action(s) to run after the VM is marked to auto-shrink.
-
Notify users of scheduled deletion: Select this option to notify the user via email about deletion of their desktop when the inactivity period is exceeded.
Note: Notifications on the Settings > Nerdio environment page must be enabled for this feature to work.
-
Message Subject: Expand this option to type the subject line of the auto-shrink message.
-
Message Text: Expand this option to open the editor to create a custom auto-shrink message for users.
Note: The following variables are available for use in the message body:
-
%HOSTPOOL%: Returns the name of the affected host pool.
-
%HOSTNAME%: Returns the specific host name.
-
%HOST_IDLE_DAYS_THRESHOLD%: Returns the configured maximum idle days before auto shrink is started.
-
%SHRINK_TIME_UTC%: Returns the exact time in UTC when the auto-shrink task is set to occur.
-
%SHRINK_DATE%: Returns the exact date when the auto-shrink task is set to occur.
-
%SHRINK_DATE_EUR%: Returns the exact date when the auto-shrink task is set to occur in dd/MM/YYYY (European) format.
-
%IMAGE_NAME%: Returns the VM's image name.
-
%FRIENDLY_WORKSPACE_NAME%: Returns the workspace's friendly name.
-
%FRIENDLY_HOSTPOOL_NAME%: Returns the host pool's friendly name.
-
%VM_SIZE%: Returns the VM's size.
-
%DISK_SKU%: Returns the VM's disk SKU.
-
%USER_NAME%: Returns the name of the user logged in to the VM.
-
-
-
Notify an additional email recipient when desktops are scheduled to be deleted: Select this option to notify an additional email recipient when desktops are scheduled to be deleted.
-
Send notification emails to: Type the additional recipient's email address.
-
Send notification emails from: Type the sender's email address.
-
Notifications frequency: From the drop-down list, select how frequently the email reminders are sent to the user.
Note: A final email is always be sent 1 day before the scheduled deletion.
-
-
-
Enter the following Auto-heal broken hosts information:
Note: Session hosts may get impaired due to domain trust issues or FSLogix configuration issues. The AVD agent reports the status of such hosts as unavailable. Admins then have to manually remove such hosts from the pool. However, Nerdio Manager allows you to configure a set of actions to repair these session hosts during the auto-scale process. Auto-scale can automatically attempt to repair "broken" session hosts by restarting and deleting/recreating them. It can make a few attempts to restart the host to try to get it back into an operational state and then either leave it alone or delete and recreate the host.
-
Auto-heal broken hosts: Toggle this option to enable auto-heal.
-
In the Sign of a broken host box, enter the following information:
-
AVD agent status: From the drop-down list, select the AVD agent status, and then from the drop-down lost below, select the session status.
Note: The status is reported to the AVD service by the AVD agent installed on the session host VM. If something is wrong, the status is something other than "Available." Not every status other than "Available" means that there is a problem. See this Microsoft article for more details. Hosts with active sessions may still be somewhat functional and such hosts are not treated as broken. Only hosts that have either no sessions at all or no active session (that is, disconnected sessions only) are considered broken by auto-scale.
-
-
First action: Enter the number of minutes to wait before running the first action.
-
Recovery actions: From the drop-down list, select the recovery action(s).
Notes:
-
You may select a VM action (for example, Restart VM or Remove VM), or a scripted action (for example, reinstall SxS, re-register host with AVD, etc.).
-
The recovery actions are run in the order shown. You can drag and drop any action to change its place in the list and, therefore, the order it is run.
-
-
Timeout between recovery actions: Type the number of minutes to wait after each recovery action step before moving on to next step (for example, Restart VM, then Remove VM, then etc.).
Note: If the Auto-Heal operation requires deletion and re-creation of a broken host VM, a spare VM is powered on to replace the capacity, if available.
-
To add an addition Sign of a broken host, select the plus
 icon.
icon.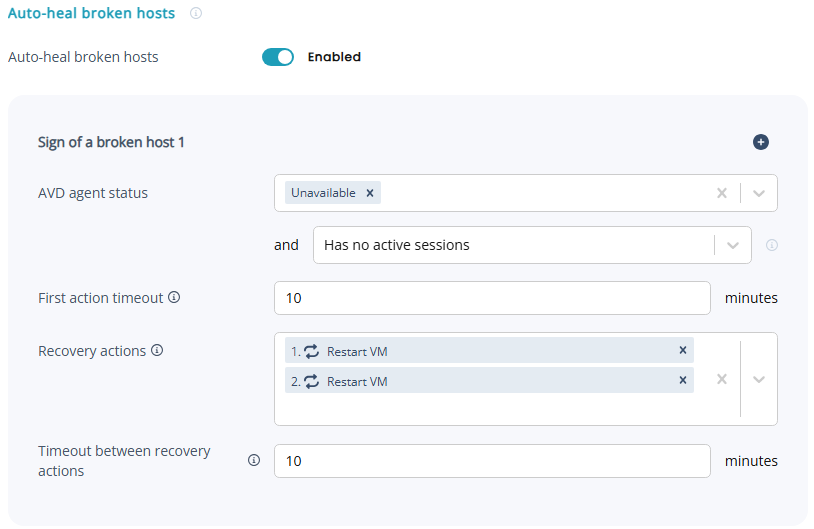
-
-
Once you have entered all the desired information, select Save.
To enable schedule-based personal host pool auto-scaling:
-
From the Auto-scale mode drop-down list, select Schedule-based.
-
From the Auto-scale profile drop-down list, select the auto scale profile.
-
Enter the following Host pool properties information:
-
Start VM on connect: Select this option to start the desktop on connect.
-
-
Enter the following Working hours information:
-
From the drop-down lists, select the Work days and Working hours the session host VMs' OS disks should be pre-staged.
-
Power off aggressiveness: From the drop-down list, select the power off aggressiveness. (Schedule-based only)
Note:
- High: Power off all session host VMs, including those with active and disconnected sessions. Users with active sessions are sent a message, defined below, and given time to sign out before their session host VM is powered off.
-
Medium: Power off only those session host VMs that do not have an active user session, including those with disconnected sessions.
-
Low: Only power off those session host VMs that have no active or disconnected sessions.
-
Power on timing: From the drop-down list, select the power on timing. (Schedule-based only)
Note:
-
Never: Do not power on session host VMs at the beginning of the working hours defined above. Users must manually power on their session host VMs.
-
Once: All sessions host VMs are only powered on once at the start of the working hours. If a session host VM is powered off after the start of the working hours, it is not automatically powered back on by auto-scale.
-
Continuously: All session host VMs are powered on at the start of the working hours. In addition, for the duration of the working hours, auto-scale automatically powers on any session host VMs that were manually powered off.
-
-
Power off timing: From the drop-down list, select the power off timing.
Note:
- Never: Do not power off session host VMs at the end of the working hours defined above.
-
Once: At the end of the working hours, all session host VMs are powered off, subject to the aggressiveness defined above. If any session host VMs are manually powered on outside of the working hours, auto-scale does not automatically power them off.
-
Continuously: At the end of the working hours, all session host VMs are powered off, subject to the aggressiveness defined above. If any session host VMs are manually powered on outside of the working hours, auto-scale automatically powers them off, subject to the aggressiveness defined above.
-
Include hosts without assigned user: Select this option to also start unassigned desktops during the auto-scale process.
Note: This may be useful for organizations wishing to perform scheduled tasks against desktops during the working day.
-
-
Enter the following Host OS disks information:
-
Set all hosts to running OS disk type during work hours: Select this option to convert all stopped host VM OS disks to running disk type during the working hours defined above.
Note: This is necessary to ensure that if a VM is started via Azure Start VM on Connect that it has the correct, high-performance disk type. When this setting is enabled, all "Disk type differs from policy" warnings are hidden for this pool.
-
Use intelligent disk pre-staging for users: Select this option to have intelligent disk pre-staging learn user behavior and automatically adjusts the disk pre-stage times.
Note: This feature requires AVD insights to be enabled and configured for the host pool.
-
Mode:If you have selected the Use intelligent desktop pre-staging for users option, then from the drop-down list, select the mode.
Note:
-
Hybrid Mode: Disks are always be pre-staged based on the defined schedule. The behavior of users whose work patterns are learned, and additional staging activity are scheduled. This function is designed as "learning mode," with the benefits of both the standard pre-stage functionality and learned requirements.
-
Automated Mode: Disks are pre-staged for existing users only according to the learned schedule. New users respect the defined schedule until Intelligent pre-staging has enough data to automate this process. Disks are pre-staged 30 minutes before anticipated user log on events.
-
-
-
-
Enter the following Auto-grow information:
Note: Automatically add desktops to the host pool when the number of unassigned desktops remaining falls below a specified threshold.
-
Auto-grow: Toggle this option on to enable auto-grow.
-
Add a new host when the number of available (not assigned to a user) falls below: Type the threshold and from the drop-down list, select whether the threshold is a number of desktops or a percentage of total desktops.
-
-
Enter the following Auto-shrink information:
Note: The system automatically remove desktops that have not been used in a long time.
-
Auto-Shrink: Toggle this option on to enable auto-shrink.
-
Delete VM if the user hasn't logged in for: Type the number of days to wait before the system automatically deletes the VM.
Note: User activity on this session host VM is determined based on Nerdio Manager auto-scale history and AVD diagnostics data. Each time the desktop is processed by auto-scale, an Azure tag with date/time the desktop was last used is set. If the desktop hasn't been used for the number of days specified in this setting, the session host VM is shut down and a "pending deletion" tag is set.
-
Desktop will be set to “Pending deletion” state and deleted after: From the drop-down list, select the "Pending deletion" duration.
Note: The desktop is set to "Pending deletion" state by the auto-scale process by adding a tag to the VM. A task is logged during this process, which can be used for admin notification of a desktop entering the "Pending deletion" state. There also are notification banners in the Nerdio Manager UI indicating that a personal host pool has VMs that are pending deletion. After the "pending deletion" period expires (default: 24 hours), the VM is permanently deleted.
-
Exclude the following groups (or individual users): Enable this option, and then select the group(s) or individual user(s) to exclude from auto-shrink.
Note: Desktops assigned to users listed here are not automatically removed, even after a prolonged time of inactivity.
-
Notify user when their desktop is about to be deleted: Select this option to notify the user via email about deletion of their desktop when the inactivity period is exceeded.
Note: Notifications on the Settings > Nerdio environment page must be enabled for this feature to work.
-
Message Subject: Expand this option to type the subject line of the auto-shrink message.
-
Message Text: Expand this option to open the editor to create a custom auto-shrink message for users.
Note: The following variables are available for use in the message body:
-
%HOSTPOOL%: Returns the name of the affected host pool.
-
%HOSTNAME%: Returns the specific host name.
-
%HOST_IDLE_DAYS_THRESHOLD%: Returns the configured maximum idle days before auto shrink is started.
-
%SHRINK_TIME_UTC%: Returns the exact time in UTC when the auto-shrink task is set to occur.
-
%SHRINK_DATE%: Returns the exact date when the auto-shrink task is set to occur.
-
-
-
Notify an additional email recipient when desktops are scheduled to be deleted: Select this option to notify additional users about auto-shrink activity.
-
Send notification emails to: Type the additional email addresses.
-
-
Send notification emails from: From the drop-down list, select the "Send From" email address.
-
-
Enter the following Messaging information:
Note: The system sends messages to any users connected to a session host that has been selected for scale in.
-
Send a warning message to active users: From the drop-down list, select the number of minutes before scaling in that the message should be sent.
-
The message should say: Type the warning message text.
-
-
Enter the following Auto-heal broken hosts information:
Note: Session hosts may get impaired due to domain trust issues or FSLogix configuration issues. The AVD agent reports the status of such hosts as unavailable. Admins then have to manually remove such hosts from the pool. However, Nerdio Manager allows you to configure a set of actions to repair these session hosts during the auto-scale process. Auto-scale can automatically attempt to repair "broken" session hosts by restarting and deleting/recreating them. It can make a few attempts to restart the host to try to get it back into an operational state and then either leave it alone or delete and recreate the host.
-
Auto-heal broken hosts: Toggle this option to enable auto-heal.
-
AVD agent status: From the drop-down list, select the desired statuses along with the session status.
Note: The status is reported to the AVD service by the AVD agent installed on the session host VM. If something is wrong, the status is something other than "Available." Not every status other than "Available" means that there is a problem. See this Microsoft article for more details. Hosts with active sessions may still be somewhat functional and such hosts are not treated as broken. Only hosts that have either no sessions at all or no active session (that is, disconnected sessions only) are considered broken by auto-scale.
-
First action timeout: Type the number of minutes to wait before running the first action.
-
Recovery actions: From the drop-down list, select the recovery action(s).
Notes:
-
You may select a VM action (for example, Restart VM or Remove VM), or a scripted action (for example, reinstall SxS, re-register host with AVD, etc.).
-
The recovery actions are run in the order shown. You can drag and drop any action to change its place in the list and, therefore, the order it is run.
-
-
Timeout between recovery actions: Type the number of minutes to wait after each recovery action step before moving on to next step (for example, Restart VM, then Remove VM, then etc.).
Note: If the Auto-Heal operation requires deletion and re-creation of a broken host VM, a spare VM is powered on to replace the capacity, if available.
-
-
Once you have entered all the desired information, select Save.